Archive for the ‘Tutorials’ Category


Building search forms with tableless models in CFWheels

This blog article was originally posted on Chris’ personal blog and is republished here with his permission.

In this post, I hope to persuade you that you will rarely ever need the Tag-based form helpers (textFieldTagselectTag, etc.) in your CFWheels apps ever again.

“How?” you ask.

The answer: through the use of a wonderful feature that we affectionately call tableless models.

How you’re probably used to coding search forms in CFWheels

So let’s code up an index form using the Tag-based helpers that you’re probably accustomed to using in this situation. The view’s job is to display a list of invoice records along with a form for narrowing by start date and end date:

<cfoutput>

#startFormTag(route="invoices", method="get")#
  #textFieldTag(name="startDate", value=params.startDate)#
  #textFieldTag(name="endDate", value=params.endDate)#
  #submitTag(value="Filter Invoices")#
#endFormTag()#

<table>
  <thead>
    <tr>
      <th>Invoice</th>
      <th>Date</th>
      <th>Amount</th>
    </tr>
  </thead>
  <tbody>
    <cfloop query="invoices">
      <tr>
        <td>#h(id)#</td>
        <td>#DateFormat(createdAt)#</td>
        <td>#DollarFormat(amount)#</td>
      </tr>
    </cfloop>
  </tbody>
</table>

</cfoutput>

This is pretty common, and I wouldn’t go as far to say that it’s wrong.

Let’s code what we need in the controller to wire everything up.

component extends="Controller" {
  function index() {
    param name="params.startDate" default="";
    param name="params.endDate" default="";
    
    local.where = [];
    
    if (IsDate(params.startDate)) {
      ArrayAppend(local.where, "createdAt >= '#params.startDate#'");
    }
    
    if (IsDate(params.endDate)) {
      local.nextDay = DateAdd("d", 1, params.endDate);
      local.nextDay = DateFormat(local.nextDay, "m/d/yyyy");
      ArrayAppend(local.where, "createdAt < '#local.nextDay#'");
    }
    
    invoices = model("invoice").findAll(where=ArrayToList(local.where, " AND "));
  }
}

But wait! We can’t have a startDate that occurs after the endDate. We better add a check for that in the controller:

component extends="Controller" {
  function index() {
    param name="params.startDate" default="";
    param name="params.endDate" default="";
    
    local.where = [];
    
    // Let's make sure the start date and end date jive.
    if (IsDate(params.startDate) && IsDate(params.endDate) && params.startDate > params.endDate) {
      flashInsert(error="The start date must be on or before the end date.");
    }
    
    if (IsDate(params.startDate)) {
      ArrayAppend(local.where, "createdAt >= '#params.startDate#'");
    }
    
    if (IsDate(params.endDate)) {
      local.nextDay = DateAdd("d", 1, params.endDate);
      local.nextDay = DateFormat(local.nextDay, "m/d/yyyy");
      ArrayAppend(local.where, "createdAt < '#local.nextDay#'");
    }
    
    invoices = model("invoice").findAll(where=ArrayToList(local.where, " AND "));
  }
}

That index action is getting pretty beefy at this point. And now we’re starting to validate our data in the controller, which can quickly turn into a tangled mess after we’ve added another field or two to the form.

Cleaning up the search form with tableless models

As it turns out, models in CFWheels come with a bunch of really helpful methods for validating data. And even though we’re not using this form to save data to a database, we can still use the model validations to validate our data. Hooray!

All that we need to do is create a CFC in our models folder that represents this particular form. The initializer will contain a call to table(false), which tells CFWheels to not try to connect it to a database.

In addition to table(false), we can call all of the model validation initializers that we need to validate the data.

Lastly, we need to create a method that validates data passed into the model and runs the query if all is well.

Here is the finished product in models/InvoiceSearchForm.cfc:

component extends="Model" {
  function config() {
    // Make it tableless
    table(false);
    
    // Validations
    validatesFormatOf(properties="startDate,endDate", type="date", allowBlank=true);
    validate("startDateBeforeEndDateValidation");
  }
  
  boolean function run() {
    // Run validations and abort if failed.
    if (!this.valid()) {
      this.results = QueryNew("");
      return false;
    }
    
    // Continue with query if validation passed.
    local.where = [];
    
    if (IsDate(this.startDate)) {
      ArrayAppend(local.where, "createdAt >= '#this.startDate#'");
    }
    
    if (IsDate(this.endDate)) {
      local.nextDay = DateAdd("d", 1, this.endDate);
      local.nextDay = DateFormat(local.nextDay, "m/d/yyyy");
      ArrayAppend(local.where, "createdAt < '#local.nextDay#'");
    }
    
    this.results = model("invoice").findAll(where=ArrayToList(local.where, " AND "));
    return true;
  }
  
  private function startDateBeforeEndDateValidation() {
    if (IsDate(this.startDate) && IsDate(this.endDate) && this.startDate > this.endDate) {
      this.addError("startDate", "Start Date must be on or before End Date");
    }
  }
}

Notice that startDate and endDate become properties on the model in the this scope. This allows us to validate those properties and refer to them in an object-oriented manner.

When the run method is called, there will be a results property set on the object containing the search query.

Next, we rewire the controller to this much simpler form:

component extends="Controller" {
  function index() {
    // Note that moving this into an object named `search` will change the
    // `params` struct slightly.
    param name="params.search.startDate" default="";
    param name="params.search.endDate" default="";
    
    // We pass the `params.search` struct in as properties on the search form
    // object.
    search = model("invoiceSearchForm").new(argumentCollection=params.search);
    
    // This runs the search and adds an error message if validation fails.
    if (!search.run()) {
      flashInsert(error="There was an error with your search filters");
    }
  }
}

Much cleaner, huh? Excluding whitespace and comments, this reduces the contents of the index action from 16 lines of actual code to 5.

This methodology also improves the view because we can now use textField instead of textFieldTag, and we can display validation errors near the affected form fields:

<cfoutput>

#startFormTag(route="invoices", method="get")#
  #textField(objectName="search", property="startDate")#
  #errorMessageOn(objectName="search", property="startDate")#
  
  #textField(objectName="search", property="endDate")#
  #errorMessageOn(objectName="search", property="endDate")#
  
  #submitTag(value="Filter Invoices")#
#endFormTag()#

<table>
  <thead>
    <tr>
      <th>Invoice</th>
      <th>Date</th>
      <th>Amount</th>
    </tr>
  </thead>
  <tbody>
    <cfloop query="search.results">
      <tr>
        <td>#h(id)#</td>
        <td>#DateFormat(createdAt)#</td>
        <td>#DollarFormat(amount)#</td>
      </tr>
    </cfloop>
  </tbody>
</table>

</cfoutput>

As a bonus, our InvoiceSearchForm model allows us to do things like set the labels/error message labels on the form fields using property, and allows us to do most of what models allow us to do: namely validations and callbacks.

component extends="Model" {
  function config() {
    table(false);
    
    // Set property labels for form fields and related error messages.
    property(name="startDate", label="Start");
    property(name="endDate", label="End");
    
    //...
  }

  //...
}

I find this to be a nice pattern because it ties the form to the model in a fairly clean, object-oriented way: the model represents the form, so it makes sense for it to define how labels on the form should appear.

Other uses for tableless models

Here are some other ideas where tableless models are a Good Idea™:

Authentication forms
The model takes care of all authentication logic.

Password change/reset forms
Move interface-based concepts like validatesConfirmationOf out of the table-based user model and into a tableless model.

Database transactions involving multiple models
Nested properties have their limits and logic related to them can really pollute your table-based models. Handle all of the logic in a model that’s intimately involved with the form.

Reports
Have you ever found yourself in a situation where you needed to run a query involving multiple database tables, but it was unclear which model to write the query in? Tableless models are a perfect way to avoid making a random decision.

NoSQL and API integration
Are you saving your data somewhere other than a relational database? You can still model the business logic using CFWheels models.

Props

Most of this inspiration came from a similar concept known as Form Objects in Ruby on Rails. (There is a great Railscast about Form Objectshere too.)

Also, major kudos to Tony Petruzzi for adding this awesome feature into CFWheels, which made its way into the v1.3 release.

CFWheels HTMX Plugin published

A few weeks ago I published a Todo app using CFWheels on the backend and HTMX to provide the interactivity on the front end to make the app look and feel like a full blown SPA app. As I was developing that app I ran into a few things that I wish we had to make development with HTMX a little easier. But I’m getting ahead of myself.

What is HTMX

Well, HTMX was released a couple of years ago and in that short time has just about exploded in the django community. So what is HTMX, HTMX tries to answer the following questions:

  • Why should only <a> and <form> be able to make HTTP requests?
  • Why should only click & submit events trigger them?
  • Why should only GET & POST methods be available?
  • Why should you only be able to replace the entire screen?

By removing these arbitrary constraints, htmx completes HTML as a hypertext medium. You may even start wondering why these features weren’t in HTML in the first place. So let’s look at an examples.

  <script src="https://unpkg.com/[email protected]"></script>
  <!-- have a button POST a click via AJAX -->
  <button hx-post="/clicked" hx-swap="outerHTML">
    Click Me
  </button>

This block of code tells the browser:

When a user clicks on this button, issue an AJAX request to /clicked, and replace the entire button with the HTML response.

Let’s look at a typical anchor tag:

<a href="/blog">Blog</a>

This anchor tag tells the browser:

When a user clicks on this link, issue an HTTP GET request to ‘/blog’ and load the response content into the browser window.

You can see how HTMX feels like a familiar extension to HTML. With this in mind lets look at a following block of HTML:

<button hx-post="/clicked"
    hx-trigger="click"
    hx-target="#parent-div"
    hx-swap="outerHTML"
>
    Click Me!
</button>

This tells HTMX:

When a user clicks on this button, issue an HTTP POST request to ‘/clicked’ and use the content from the response to replace the element with the id parent-div in the DOM

So by using hx-get, hx-post, hx-put, hx-patch, or hx-delete we gain access to all the HTTP verbs. Imagine a delete button on a table row that actually issues a HTTP Delete to your backend.

The hx-trigger attribute gives us access to all the page events. HTML elements have sensible defaults, the button tag will get triggered by a click by default and an input tag will get triggered by a change event by default. But there are some special events as well, like the load event that will trigger the action when the page is initially loaded or the revealed event that will trigger the action, when the element scrolls into view. Think of an infinite scroll UX pattern where an element scrolls into view, which triggers a call to the backend to load more data that gets added to the bottom of the page.

The hx-target attribute lets you specify a different tag to target than the element that triggered the event. You have the typical CSS selectors but also some special syntax like closest TR to target the closest table row.

The last attribute shown in the example above is the hx-swap which specifies how to swap the response into the element. By default, the response replaces the innerHTML of the target element but you can just as easily replace the entire target element by using outerHTML. There are a few more designators that allow you to finely control placing the response before or after the target element in its parent element or at the begging of or end of a target’s child elements.

This is just scratching the surface of what HTMX can do but you should be getting the picture. By sprinkling in a handful of HTML attributes into your markup you can gain interactivity that was the domain of full blown JavaScript frontend frameworks in the past.

Why should we care as CFWheels developers

By default HTMX is backend agnostic. It just deals with HTML and doesn’t care what backend technology you use to generate it. This could just as easily be used in a plain vanilla CFML app or your framework of choice, hopefully it would be CFWheels since you are here reading this. Wheels has some built in features that make working with HTMX a breeze. We already have a templating system, we already have a router and controllers to intercept the HTTP request. We have a number of rendering methods that make responding to requests simple.

If the request is a for a full page, use the renderView() method or simply let the controller hand the request off to the view which in turn renders the view page. If the request is for a portion of the final page then use the renderPartial() method and return a snippet of code tucked away in a partial. The same partial could be used by your initial view page, keeping your code DRY. Sometimes, you just want to return a small bit of text or no text at all and it doesn’t make sense to build out a view or partial for every instance of these scenarios, that’s when the renderText() method comes in handy. Imagine a typical index page from a CRUD application that lists a bunch of rows of data and some action buttons on each row. Let’s assume, one of these buttons is a delete button. Look at the following code:

// image this button on a table row
<button hx-delete="/products/15" 
        hx-target="closest hr"
        hx-swap="outerHTML"
        hx-confirm="Are you sure?">
    Delete
</button>

// imagine this code in your action
function delete() {
  aProduct = model("product").findByKey(params.key);
  aProduct.delete();
  renderText("");
}

So what does the above combination do:

When the user clicks on the Delete button, prompt the user to make sure they are sure they wish to delete the record, if the user affirms the request, issue a DELETE request to the server. The server in turn deletes the record and sends back an empty text response to the client. When the response comes back to the frontend, find the closes table row, and remove it from the table.

We just made an Ajax call to the server, removed the record from the database, and correspondingly updated the UI by just removing a single element from the DOM.

What does this plugin do?

By default, HTMX adds some request headers to the call sent to the backend which can be interrogated to see if the request is in fact an HTMX request. If the request is actually an HTMX request, some additional request headers are made available which can add more color to the call being processed. This plugin automatically adds these header elements to the params structure which makes them automatically available to your controller actions. This makes it easier to work with this data and incorporate it into your request processing logic. Take a look at the following example:

function index() {
  if (params.htmx.reqeust) {
    renderPartial(partial="myPartial", layout="false");
  }
}

This code block says:

When a request comes in to the index action of the controller, check to see if this is an HTMX request and if it is, respond with the mypartial partial and don’t wrap it with the layout. Otherwise respond with the index view page of the current controller.

Think of a paginated index page, where the first call to the index action sends the view with the first page of data and a button or element on the page triggers additional calls to the same action but this time only the next page of data is sent to the front end.

Installing the Plugin

To install this plugin, issue the following command from the root of your application in a CommandBox prompt:

install cfwheels-htmx-plugin

Once installed, reload your application and you’re off to the races.

TodoMVC Implementation with CFWheels and HTMX

Recently I’ve been playing around with HTMX and really starting to love it. So what is HTMX? From their website:

htmx gives you access to  AJAXCSS Transitions,  WebSockets and Server Sent Events directly in HTML, using attributes, so you can build modern user interfaces with the simplicity and power of hypertext

Introduction to htmx

And also:

Why should only <a> and <form> be able to make HTTP requests?
Why should only click & submit events trigger them?
Why should only GET & POST methods be available?
Why should you only be able to replace the entire screen?

By removing these arbitrary constraints, htmx completes HTML as a hypertext

Motivation behind htmx

So what does this all mean? Well, in its simplest form, it means being able to build modern web applications with the UX that users have come to expect, with the HTML, CSS, and the backend technology of your choice which in our case is CFML and CFWheels.

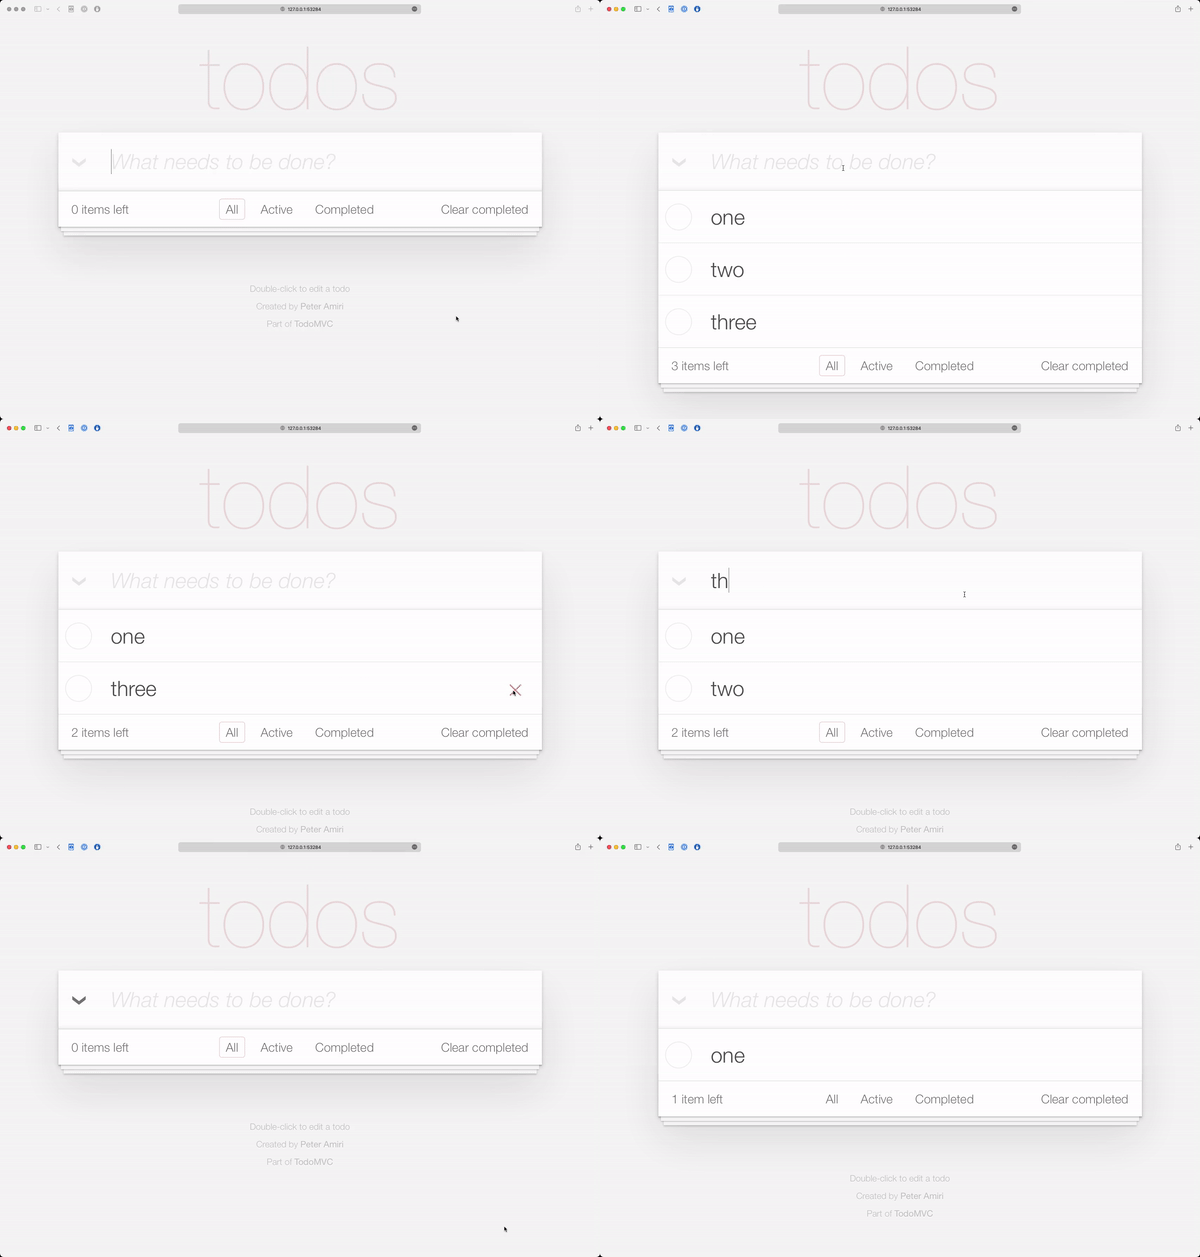
So I decide to see if I could build the TodoMVC project using no hand written JavaScript and only relying on HTML, CSS, and CFWheels. I downloaded the template project and took a look at the application specs to get an idea of what to implement.

Here is the video of the running app:

So if you want to run the app locally, you’ll need to have Commandbox installed and the CFWHeels CLI commands for CommandBox installed as well. With those two items taken care of, launch a CommandBox and issue the following commands.

wheels g app name=todo datasourceName=todo template=cfwheels-todomvc-htmx --setupH2
package install
server start

Let’s look at those lines and talk about what they do. The first line wheels g app will download the template app from Forgbox.io and create a CFWheels application and name it todo. It also create a H2 database and configures the datasource for you. The next line will install all the dependencies of our app. These include, a few CommandBox modules to make development easier, the CFWheels core framework directory and place it into the wheels folder, and install the H2 drivers into our Lucee server for out application. The last line will start our Lucee server. I’ve also added a setting to automatically run the Database migrations on application startup so the database schema is created.

You can checkout the code on GitHub. Let me know what you think.

EDIT: The Lucee server that starts up will have cfwheels set as its admin password.

Starting a New CFWheels Project with the CLI

If you’re not using CommandBox for your CFWheels development, you’re in for a treat. This is a quick post to show case how easy it is to start a new CFWheels project with the help of the the wheels command for CommandBox.

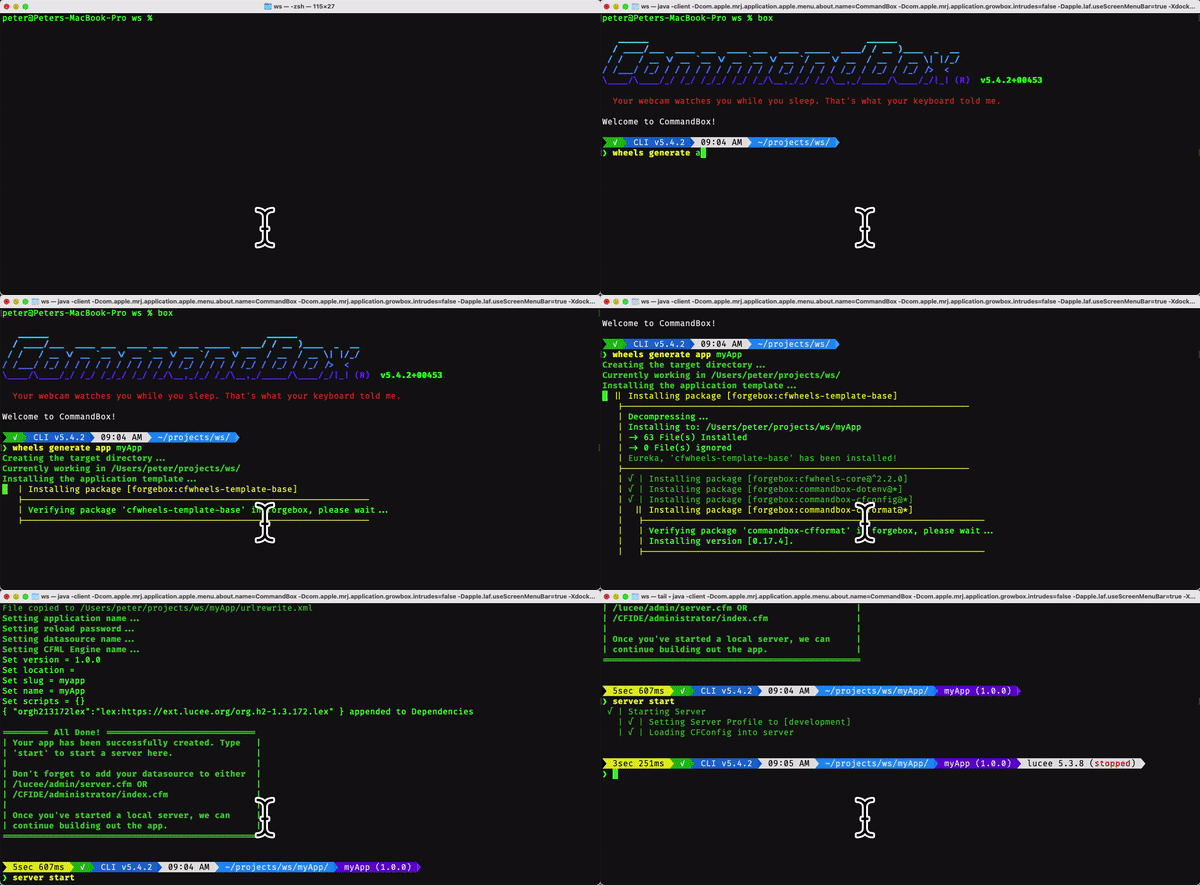
If you have CommandBox installed and have the cfwheels-cli module installed, then simply launch CommandBox by typing box and then issue the command wheels generate app myApp . This simple command will take care of the following:

  • Create a folder in the current working directory for the project and name if myApp
  • Copy the cfwheels-template-base package from ForgeBox and expand it in the root of the myApp folder
  • Copy the cfwheels-core package from ForgeBox and expand it into the wheels folder in the root of the myApp folder
  • This command also takes care of naming your app myApp or whatever name you pass in

You may be asking yourself, what are all these packages you’re talking about? Well, we are starting to use the package management system provided by ForgeBox and CommandBox to make distribution of sample apps easier as well as installing and updating projects based on CFWheels. More to come on these topics later but this is just to whet your appetite.

Debugging plugin performance in CFWheels 2.x with FusionReactor

The Issue

Shortly after the release of CFWheels 2.0, we started to get reports of slower running requests under certain conditions. For instance, a page which might have had 1000 calls to `linkTo()` could take anything from 1-2ms to 5-6ms a call, which, after 1000 iterations, is one hell of a performance bottle neck. In 1.x, the same call would be between 0-1ms, usually with a total execution time of sub 200ms. 

This behaviour was something which could be proven by a developer, but not everyone was seeing the same results: what was the difference? Plugins (or rather, plugins which override or extend a core function, like linkTo()). To make matters worse, the performance degradation was doubled for each plugin, so you might get 1-2ms for 1 plugin, 2-4 ms for adding another plugin and so on.

So what was causing this?

Enter FusionReactor

We approached FusionReactor, who were kind enough to give us a temporary licence to help debug the issue (it’s great when companies support open-source!). So next up were some tests to help diagnose the issue.

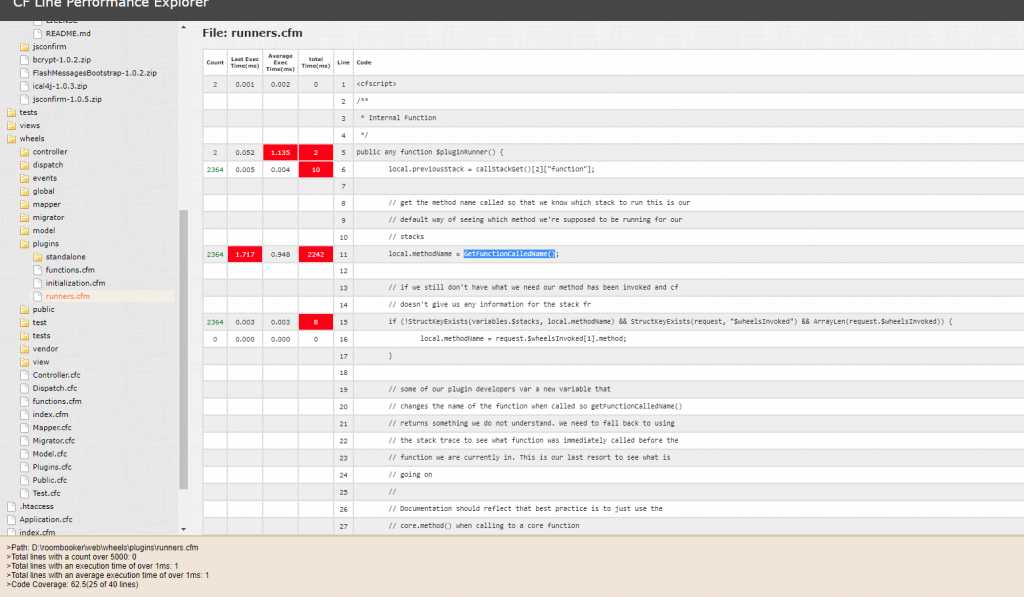
Installing FusionReactor was really simple. As we use CommandBox locally, we could just utilise the existing module via install commandbox-fusionreactor to bootstrap FusionReactor onto our local running servers, which gave us access to the FR instance, already plumbed in. As we were looking for a specific line of code, we also installed the FusionReactor Lucee Plugin and configured it track CFML line execution times using the CF line performance explorer.

This was instantly illuminating, and tracked the problem to our new pluginrunner() method. When we released CFWheels 2.0, there was a fairly heft rewrite of the plugins system. It was designed to be able to allow for plugins to be chained, and execute in a specific order, so you could hypothetically have the result from one plugin overriding the previous one in the chain.

The way it did this was by creating a “stack” of plugins in an array, working out where it was in that stack, and executing the next plugin in the stack till it reached the end. It did that via a combination of callStackGet() and getFunctionCalledName() function to do the comparison.

As you can see from the screenshot below, the line debugger clearly highlights this. This app had four plugins, two of which extended core functions.

Example of FR Lucee 4 Line Debugger

callStackGet() gets invoked 2364 times in this example, but appeared performant, only causing 10ms execution time. getFunctionCalledName() is called the same number of times, but has a total execution time of 2242ms(!). We had our potential culprit. Either way, it was looking like the combination of calling the stack and trying to find the calling function name which was causing so much pain. I suspect it’s to do with how Java deals with this: I think it might be calling a full stack trace and writing it to disk on each call – at least that was the hint from FusionReactor’s thread profiler (I’m sure those who have a better understanding of Java’s underlying functions will chip in).

After some deliberation, we decided to revert this behaviour in CFWheels 2.1 back to how it used to work in 1.x, as the vast majority weren’t using it, but were being affected by it. We’d seen no plugins in the wild which used this behaviour either, which was largely undocumented.

Obviously thanks to FusionReactor for helping us out – hopefully this gives some insight into just one of the ways FusionReactor can be used. Maybe one day I’ll understand Java stack traces – maybe.

Screencast: Introduction to Unit Testing in CFWheels 2.x

Update: (2nd part on controllers)

Creating a mega quick JSON API in CFWheels 2.x

Screencast: Routing in CFWheels 2.x – part 2

Covers constraints, wildcard segments and shallow resources.

Screencast: Routing in CFWheels 2.x

A quick  overview of routing in Wheels 2.x


Screencast: Basic CRUD interface in CFWheels 2.x