Archive for the ‘Tips & Tricks’ Category


Building search forms with tableless models in CFWheels

This blog article was originally posted on Chris’ personal blog and is republished here with his permission.

In this post, I hope to persuade you that you will rarely ever need the Tag-based form helpers (textFieldTagselectTag, etc.) in your CFWheels apps ever again.

“How?” you ask.

The answer: through the use of a wonderful feature that we affectionately call tableless models.

How you’re probably used to coding search forms in CFWheels

So let’s code up an index form using the Tag-based helpers that you’re probably accustomed to using in this situation. The view’s job is to display a list of invoice records along with a form for narrowing by start date and end date:

<cfoutput>

#startFormTag(route="invoices", method="get")#
  #textFieldTag(name="startDate", value=params.startDate)#
  #textFieldTag(name="endDate", value=params.endDate)#
  #submitTag(value="Filter Invoices")#
#endFormTag()#

<table>
  <thead>
    <tr>
      <th>Invoice</th>
      <th>Date</th>
      <th>Amount</th>
    </tr>
  </thead>
  <tbody>
    <cfloop query="invoices">
      <tr>
        <td>#h(id)#</td>
        <td>#DateFormat(createdAt)#</td>
        <td>#DollarFormat(amount)#</td>
      </tr>
    </cfloop>
  </tbody>
</table>

</cfoutput>

This is pretty common, and I wouldn’t go as far to say that it’s wrong.

Let’s code what we need in the controller to wire everything up.

component extends="Controller" {
  function index() {
    param name="params.startDate" default="";
    param name="params.endDate" default="";
    
    local.where = [];
    
    if (IsDate(params.startDate)) {
      ArrayAppend(local.where, "createdAt >= '#params.startDate#'");
    }
    
    if (IsDate(params.endDate)) {
      local.nextDay = DateAdd("d", 1, params.endDate);
      local.nextDay = DateFormat(local.nextDay, "m/d/yyyy");
      ArrayAppend(local.where, "createdAt < '#local.nextDay#'");
    }
    
    invoices = model("invoice").findAll(where=ArrayToList(local.where, " AND "));
  }
}

But wait! We can’t have a startDate that occurs after the endDate. We better add a check for that in the controller:

component extends="Controller" {
  function index() {
    param name="params.startDate" default="";
    param name="params.endDate" default="";
    
    local.where = [];
    
    // Let's make sure the start date and end date jive.
    if (IsDate(params.startDate) && IsDate(params.endDate) && params.startDate > params.endDate) {
      flashInsert(error="The start date must be on or before the end date.");
    }
    
    if (IsDate(params.startDate)) {
      ArrayAppend(local.where, "createdAt >= '#params.startDate#'");
    }
    
    if (IsDate(params.endDate)) {
      local.nextDay = DateAdd("d", 1, params.endDate);
      local.nextDay = DateFormat(local.nextDay, "m/d/yyyy");
      ArrayAppend(local.where, "createdAt < '#local.nextDay#'");
    }
    
    invoices = model("invoice").findAll(where=ArrayToList(local.where, " AND "));
  }
}

That index action is getting pretty beefy at this point. And now we’re starting to validate our data in the controller, which can quickly turn into a tangled mess after we’ve added another field or two to the form.

Cleaning up the search form with tableless models

As it turns out, models in CFWheels come with a bunch of really helpful methods for validating data. And even though we’re not using this form to save data to a database, we can still use the model validations to validate our data. Hooray!

All that we need to do is create a CFC in our models folder that represents this particular form. The initializer will contain a call to table(false), which tells CFWheels to not try to connect it to a database.

In addition to table(false), we can call all of the model validation initializers that we need to validate the data.

Lastly, we need to create a method that validates data passed into the model and runs the query if all is well.

Here is the finished product in models/InvoiceSearchForm.cfc:

component extends="Model" {
  function config() {
    // Make it tableless
    table(false);
    
    // Validations
    validatesFormatOf(properties="startDate,endDate", type="date", allowBlank=true);
    validate("startDateBeforeEndDateValidation");
  }
  
  boolean function run() {
    // Run validations and abort if failed.
    if (!this.valid()) {
      this.results = QueryNew("");
      return false;
    }
    
    // Continue with query if validation passed.
    local.where = [];
    
    if (IsDate(this.startDate)) {
      ArrayAppend(local.where, "createdAt >= '#this.startDate#'");
    }
    
    if (IsDate(this.endDate)) {
      local.nextDay = DateAdd("d", 1, this.endDate);
      local.nextDay = DateFormat(local.nextDay, "m/d/yyyy");
      ArrayAppend(local.where, "createdAt < '#local.nextDay#'");
    }
    
    this.results = model("invoice").findAll(where=ArrayToList(local.where, " AND "));
    return true;
  }
  
  private function startDateBeforeEndDateValidation() {
    if (IsDate(this.startDate) && IsDate(this.endDate) && this.startDate > this.endDate) {
      this.addError("startDate", "Start Date must be on or before End Date");
    }
  }
}

Notice that startDate and endDate become properties on the model in the this scope. This allows us to validate those properties and refer to them in an object-oriented manner.

When the run method is called, there will be a results property set on the object containing the search query.

Next, we rewire the controller to this much simpler form:

component extends="Controller" {
  function index() {
    // Note that moving this into an object named `search` will change the
    // `params` struct slightly.
    param name="params.search.startDate" default="";
    param name="params.search.endDate" default="";
    
    // We pass the `params.search` struct in as properties on the search form
    // object.
    search = model("invoiceSearchForm").new(argumentCollection=params.search);
    
    // This runs the search and adds an error message if validation fails.
    if (!search.run()) {
      flashInsert(error="There was an error with your search filters");
    }
  }
}

Much cleaner, huh? Excluding whitespace and comments, this reduces the contents of the index action from 16 lines of actual code to 5.

This methodology also improves the view because we can now use textField instead of textFieldTag, and we can display validation errors near the affected form fields:

<cfoutput>

#startFormTag(route="invoices", method="get")#
  #textField(objectName="search", property="startDate")#
  #errorMessageOn(objectName="search", property="startDate")#
  
  #textField(objectName="search", property="endDate")#
  #errorMessageOn(objectName="search", property="endDate")#
  
  #submitTag(value="Filter Invoices")#
#endFormTag()#

<table>
  <thead>
    <tr>
      <th>Invoice</th>
      <th>Date</th>
      <th>Amount</th>
    </tr>
  </thead>
  <tbody>
    <cfloop query="search.results">
      <tr>
        <td>#h(id)#</td>
        <td>#DateFormat(createdAt)#</td>
        <td>#DollarFormat(amount)#</td>
      </tr>
    </cfloop>
  </tbody>
</table>

</cfoutput>

As a bonus, our InvoiceSearchForm model allows us to do things like set the labels/error message labels on the form fields using property, and allows us to do most of what models allow us to do: namely validations and callbacks.

component extends="Model" {
  function config() {
    table(false);
    
    // Set property labels for form fields and related error messages.
    property(name="startDate", label="Start");
    property(name="endDate", label="End");
    
    //...
  }

  //...
}

I find this to be a nice pattern because it ties the form to the model in a fairly clean, object-oriented way: the model represents the form, so it makes sense for it to define how labels on the form should appear.

Other uses for tableless models

Here are some other ideas where tableless models are a Good Idea™:

Authentication forms
The model takes care of all authentication logic.

Password change/reset forms
Move interface-based concepts like validatesConfirmationOf out of the table-based user model and into a tableless model.

Database transactions involving multiple models
Nested properties have their limits and logic related to them can really pollute your table-based models. Handle all of the logic in a model that’s intimately involved with the form.

Reports
Have you ever found yourself in a situation where you needed to run a query involving multiple database tables, but it was unclear which model to write the query in? Tableless models are a perfect way to avoid making a random decision.

NoSQL and API integration
Are you saving your data somewhere other than a relational database? You can still model the business logic using CFWheels models.

Props

Most of this inspiration came from a similar concept known as Form Objects in Ruby on Rails. (There is a great Railscast about Form Objectshere too.)

Also, major kudos to Tony Petruzzi for adding this awesome feature into CFWheels, which made its way into the v1.3 release.

CFWheels Fully Embraces ForgeBox Packages

As you may know, many years ago CFWheels embraced the distribution of Plugins via ForgeBox packages instead of maintaining our own directory. But the framework itself remains illusive. There was some work done in the last few months to put up packages for the framework but those packages were being maintained by hand which made them a show stopper for a long term solution.

Well, thanks to a new CI workflow based on GitHub Actions we now have the building and publishing of the packages fully automated. Giving credit where credit is due, the new workflow borrows heavily from the ColdBox workflow. It used GitHub Actions, Ant, and CommandBox to automate the process.

So what does all this mean for you, let’s cut to the chase. This means you can now install a fresh copy of the framework using the following command:

box install cfwheels-base-template

This will pull down a copy of the latest stable release of the template files and then pull down a copy of the latest stable release of the framework via package dependencies. In fact the CI workflow mentioned about publishes two packages cfwheels which is the core framework directory and cfwheels-base-template which is all the other files you need to scaffold the framework.

We’ve even backfilled all the prior released versions of the framework all the way back to version 1.0.0. So you can install a particular version of the framework using the following command:

box install [email protected]

In addition you can install the bleeding edge which includes all the work in process towards the next major release using:

box install cfwheels-base-template@be

And if you ever just need to get a copy of the latest framework files simply use the following command:

box install cfwheels

All this means that upgrading to a newer version of the framework should be much easier going forward. Frankly you should just need to modify the version of the dependency in the box.json file and issue a box update command. But we’ll document that more fully when we make our next release.

For now please feel free to play with all this package goodness and let us know if we fumbled anything.

TodoMVC Implementation with CFWheels and HTMX

Recently I’ve been playing around with HTMX and really starting to love it. So what is HTMX? From their website:

htmx gives you access to  AJAXCSS Transitions,  WebSockets and Server Sent Events directly in HTML, using attributes, so you can build modern user interfaces with the simplicity and power of hypertext

Introduction to htmx

And also:

Why should only <a> and <form> be able to make HTTP requests?
Why should only click & submit events trigger them?
Why should only GET & POST methods be available?
Why should you only be able to replace the entire screen?

By removing these arbitrary constraints, htmx completes HTML as a hypertext

Motivation behind htmx

So what does this all mean? Well, in its simplest form, it means being able to build modern web applications with the UX that users have come to expect, with the HTML, CSS, and the backend technology of your choice which in our case is CFML and CFWheels.

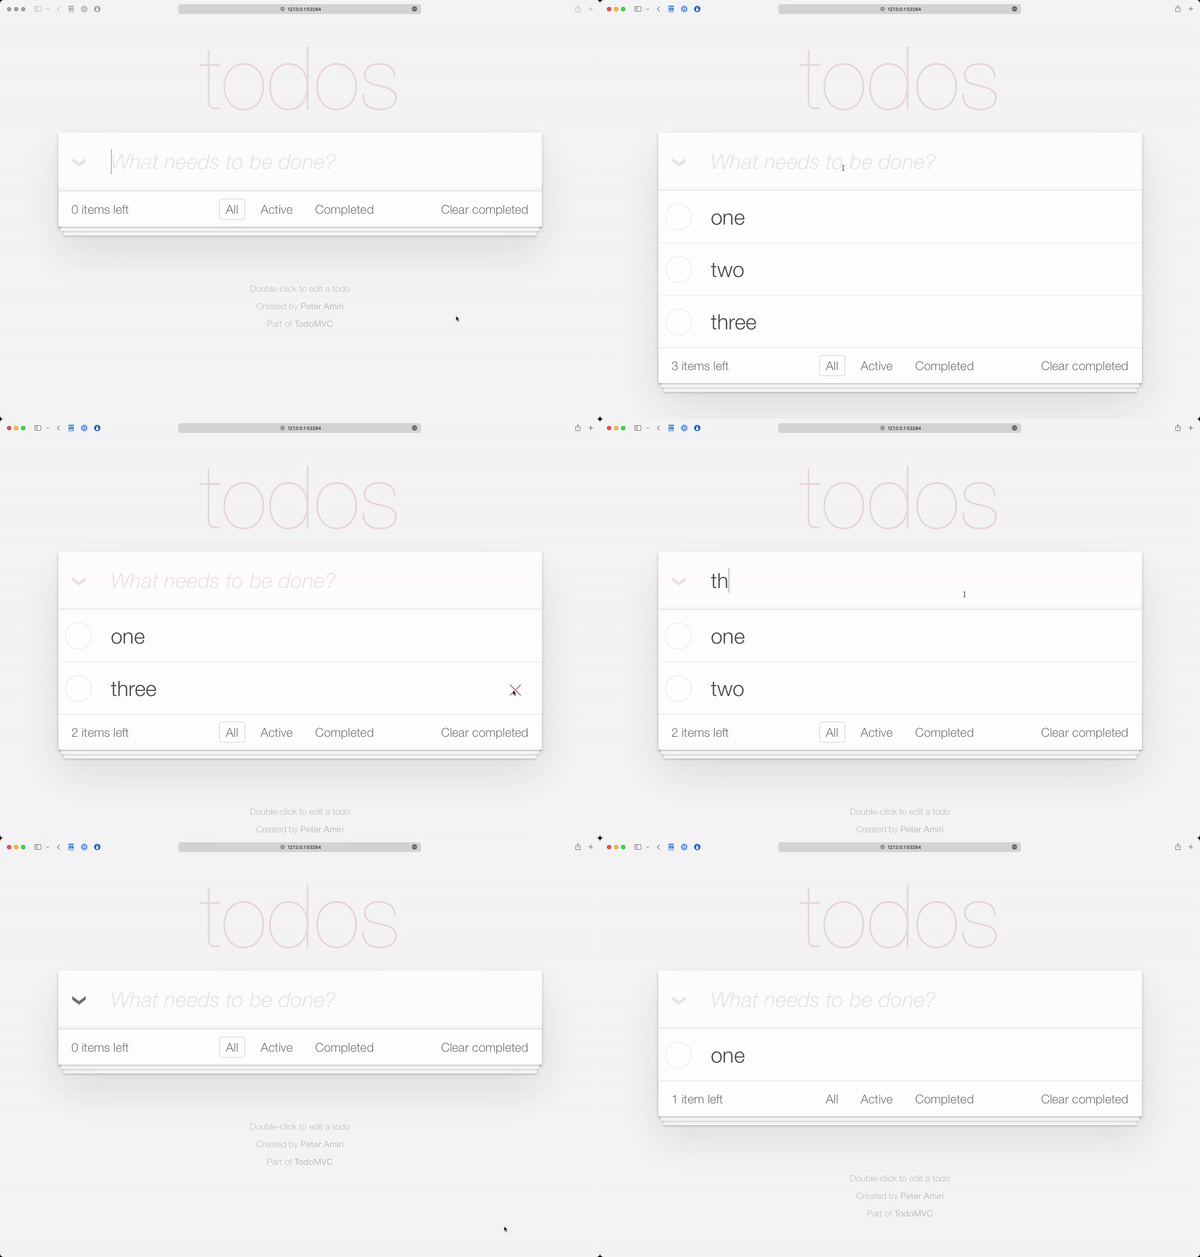
So I decide to see if I could build the TodoMVC project using no hand written JavaScript and only relying on HTML, CSS, and CFWheels. I downloaded the template project and took a look at the application specs to get an idea of what to implement.

Here is the video of the running app:

So if you want to run the app locally, you’ll need to have Commandbox installed and the CFWHeels CLI commands for CommandBox installed as well. With those two items taken care of, launch a CommandBox and issue the following commands.

wheels g app name=todo datasourceName=todo template=cfwheels-todomvc-htmx --setupH2
package install
server start

Let’s look at those lines and talk about what they do. The first line wheels g app will download the template app from Forgbox.io and create a CFWheels application and name it todo. It also create a H2 database and configures the datasource for you. The next line will install all the dependencies of our app. These include, a few CommandBox modules to make development easier, the CFWheels core framework directory and place it into the wheels folder, and install the H2 drivers into our Lucee server for out application. The last line will start our Lucee server. I’ve also added a setting to automatically run the Database migrations on application startup so the database schema is created.

You can checkout the code on GitHub. Let me know what you think.

EDIT: The Lucee server that starts up will have cfwheels set as its admin password.

Starting a New CFWheels Project with the CLI

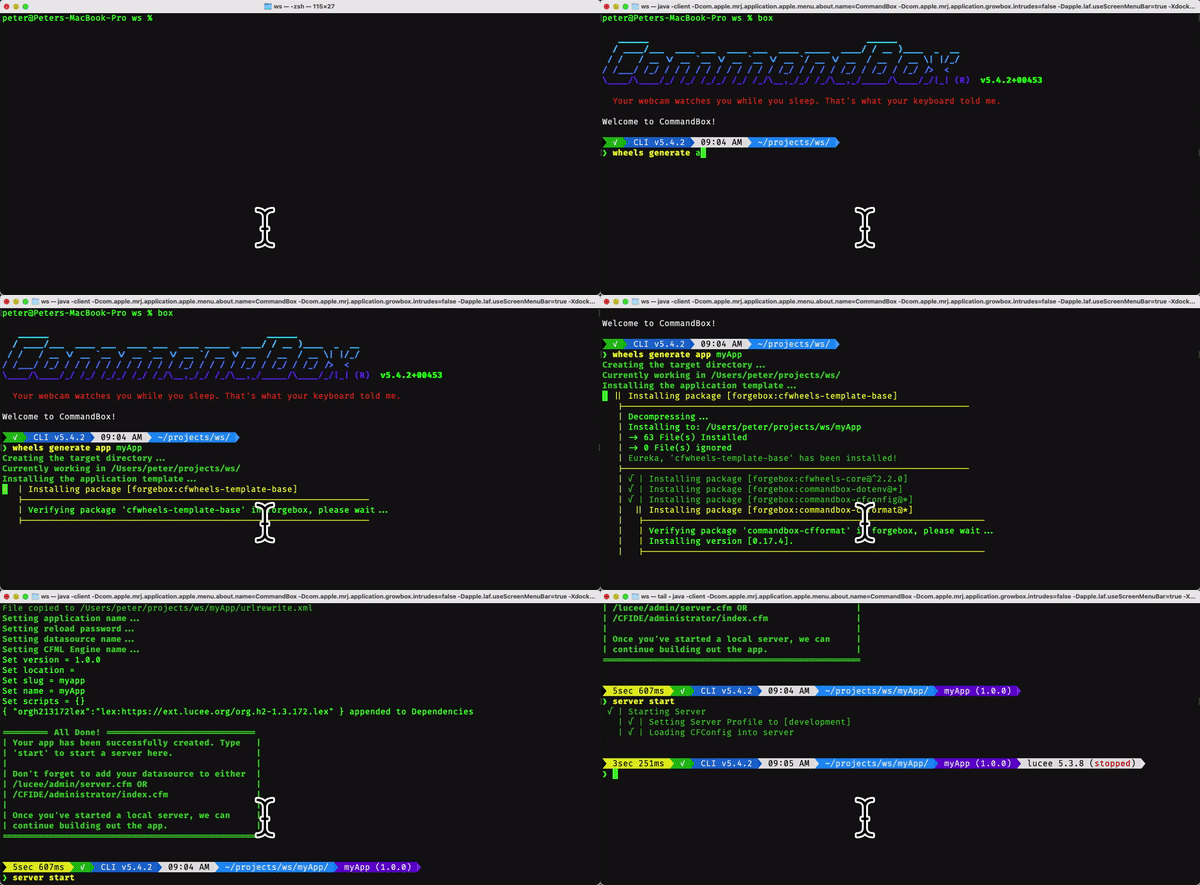
If you’re not using CommandBox for your CFWheels development, you’re in for a treat. This is a quick post to show case how easy it is to start a new CFWheels project with the help of the the wheels command for CommandBox.

If you have CommandBox installed and have the cfwheels-cli module installed, then simply launch CommandBox by typing box and then issue the command wheels generate app myApp . This simple command will take care of the following:

  • Create a folder in the current working directory for the project and name if myApp
  • Copy the cfwheels-template-base package from ForgeBox and expand it in the root of the myApp folder
  • Copy the cfwheels-core package from ForgeBox and expand it into the wheels folder in the root of the myApp folder
  • This command also takes care of naming your app myApp or whatever name you pass in

You may be asking yourself, what are all these packages you’re talking about? Well, we are starting to use the package management system provided by ForgeBox and CommandBox to make distribution of sample apps easier as well as installing and updating projects based on CFWheels. More to come on these topics later but this is just to whet your appetite.

Screencast: Introduction to Unit Testing in CFWheels 2.x

Update: (2nd part on controllers)

Testing Plugins on CFWheels 2.x and Travis CI via commandbox

One of the nicest things about CFWheels 2.x is the tighter integration with command-line tools such as Commandbox. We can take advantage of the new testing suite JSON return type and the new CFWheels CLI in Commandbox 2.x to easily build a Travis CI test. It’s perhaps easiest to just show the .travis.yml file – this goes in the root of your gitHub plugin repository, and once you’ve turned on testing under Travis.org, will run your test suite on every commit.

In sum, this:

  1. Installs Commandbox
  2. Installs the CFWheels CLI
  3. Installs the master branch of the CFWheels repository
  4. Installs your plugin from your repository (rather than the forgebox version which will be the version behind)
  5. Starts the local server
  6. Runs the test suite, pointing only at your plugin’s unit tests

Naturally, you could do more complex things with this, such as multiple CF Engines, and maybe even multiple CFWheels versions, but for a quick setup it’s a good starting point!

Unit Testing your new 2.x app in 2.x beta

Hands up if you’ve ever found a bug in your application..

Upgrades, feature enhancements and bug fixes are all part of the development lifecycle, but quite often with deadlines, it’s difficult to manually test the entire functionality of your application with every change you make. What if there were an automated way of checking if that change you’re making is going to break something?

Enter the CFWheels test framework!

In the past, writing an automated test suite against your application meant downloading, configuring and learning a completely separate framework. To help address this issue, CFWheels includes a small, simple, yet powerful testing framework. Whilst this has been part of the core in 1.x, it’s never been properly documented, and with 2.x, we’ve introduced lots of new features to help test your application.

Here is a simple example of unit testing a helper function that adds two numbers.

The same idea can be applied to just about any function in your application. Here are some of the things you might want to test:

  • Global helper functions return the values expected
  • That custom model validations return error messages when a value is not valid
  • Model callbacks are fired and produce the expected result
  • Controllers produce the expected output
  • Controllers redirect to the correct location

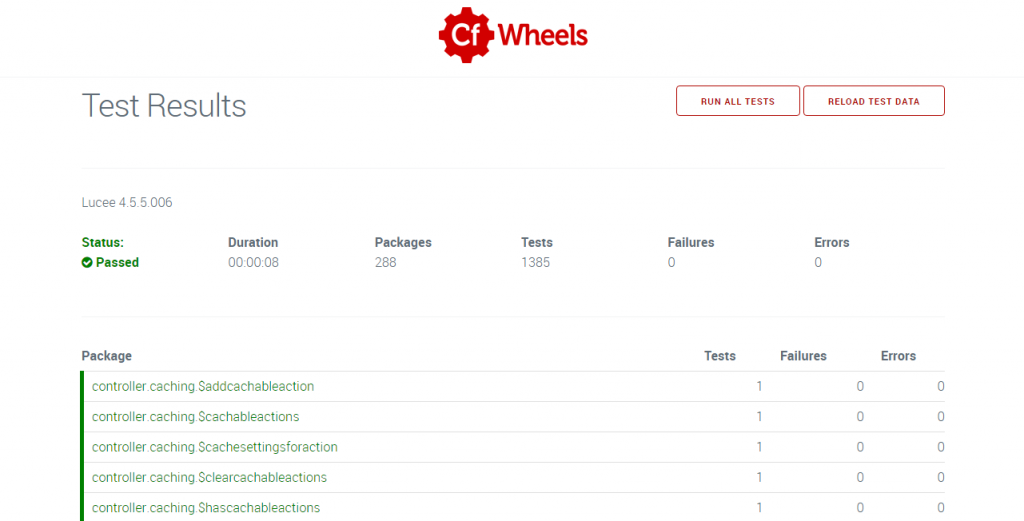
Once you have a comprehensive test suite, you can make code changes with a greater sense of confidence that you have not introduced bugs (regressions) into your application. This gives you the opportunity to implement automated test runners into a continuous integration platform like Jenkins or TravisCI.

Don’t just take our word for it.. well actually, DO take our word for it as CFWheels 2.0 has been developed exclusively against the inbuilt test framework.

For those of you who have been using the testing framework in your CFWheels 1.x applications, the 2.0 framework has a number of improvements around setup, teardown and a super handy processRequest function:

You get lots of handy information back, like the body contents, the status code of the request, and more.

Want to get going? Check the comprehensive tutorial at guides.cfwheels.org

Calling all plugin authors! Time for 2.x…

With CFWheels 2.0 beta around the corner, it’s time to have a cold hard look at the CFWheels plugin ecosystem.

With 2.x, we’ve taken the opportunity to modernise how we deal with plugins. If you’re a plugin author who has previously released something for 1.x, you’ll be pleased to hear there aren’t that many changes required to get your plugins playing nicely with 2.x, but it’s definitely a good time to revisit what you’ve got out there.

Introducing Forgebox.io

One of the main problems we had previously was a lack of a centralised repository of CFwheels plugins. The old system relied on a bit too much manual updating, and over time got a little long in the tooth. So now, all plugins should be added to forgebox.io, specifically in the CFWheels Plugins category. If you go and have a look now, you’ll see a few added by the core team as examples. Adding your plugin shouldn’t be too much hard work, but it’s definitely worth setting yourself up properly to publish to forgebox automatically via the commandline. There’s an extensive tutorial over at guides.cfwheels.org which we recommend you follow. In short, you ideally need a properly configured box.json file and for your plugins to use git tagged releases (ideally). If you’ve not installed commandbox and the CFWheels CLI, now is definitely the time to try it!

Easier for other developers too

Once your plugin is in the forgebox system, other CFWheels users can install your plugin with a single CLI command: install slugName; If they’ve got the CFWheels CLI installed, it will automatically create appropriate .zip files with the correct version number (which you’ll have set in box.json) too. They’ll also be able to view all existing plugins with wheels plugins list  making it extra quick to find the plugin they need. Dependencies are then tracked in that user’s box.json file, so they can even distribute an app without your plugin, and then simply run install to go and download the correct version later: they can even update to the latest version of your plugin via the CLI too, or freeze it to a specific version.

Automatic Java Mappings

One of the nice new features of 2.x is the automatic java library mappings which plugins can now take advantage of. Previously, you had to rely on the developer to manually add an entry into this.javaSettings.loadpaths if your plugin required use of a .class or .jar file. Now, we scan the plugin folders on startup, and automatically add any folders which contain .jar or .class files. One less step for configuration! You can see an example of this in the CFWheels bCrypt plugin, which adds a quick wrapper around the bCrypt java class.

Don’t forget your comments!

In a previous post, we talked about the new embedded documentation: plugins can now take advantage of this. For plugin authors, we’re recommending you comment all public functions – here’s a quasi code example below.

The important part is the [section: Plugins] and [category: Plugin Name] part, which will automatically sort your functions in the correct place in the internal documentation. It’s a good habit to get into, and will help other users of your plugin too.

Oh, and unit tests 🙂

Don’t forget to write some unit tests too (hey, don’t we all do TDD?); there’s been some changes to the test suite in 2.x, and writing unit tests is loads easier. More to follow on:

  • New functions for testing in 2.x
  • Running plugin tests via command line,
  • How to add your plugin to Travis CI for continuous integration testing